用Blender渲染SIGGRAPH ASIA的Fast Forward
记录一下制作Siggraph Asia 2021的Fast Forward视频制作过程,主要使用Blender来渲染点云以及模型,也许以后用得上。
先看看渲染的视频吧,求个一键三连~
基本操作
最重要的是需要先开启根据软件操作获得python代码的选项!!!在Edit-Preference-Python Tooltips中勾选上,这样任何操作就能在Scripting页上看到对应的python代码了。接下来有一些常用快捷键:
- A = 全选
- Shift + A = 新建物体(Add)
- 选择物体 + G = 跟随鼠标移动(Grab?)
- 选择物体 + R = 跟随鼠标旋转(Rotate)
- 选择物体 + S = 改变物体的大小(Scale)
- 其它请去看魔性的blender快捷键之歌
python代码里主要的几个模块如下:
- bpy.ops: 对于操纵3D对象,最重要的两个类是bpy.ops.object和bpy.ops.mesh。Object类包含用于同时操作多个选定对象的函数以及许多常规实用程序。Mesh类包含用于一次操作一个对象的顶点、边和面的函数。
- bpy.context: context(正文)是blender数据管理中的一个全局变量集合,它包含了目前被选择的和激活的(物体的两种属性状态)的物体的信息,还记录了当前物体的编辑模式用于按各种状态条件访问 Blender 的对象和区域(如用户选定的对象),用于将我们指向对象组(即
bpy.context类将生成对bpy.data类的数据块的引用)。 - bpy.data: blender界面上所有可使用调节的对象内容(包括mesh模型、lamp灯光、camera摄像机,material材质等)都在python中以特定的类型存储起来用于访问Blender的内部数据,包含确定对象形状和位置的所有数据。
其它的就对照Python Tooltips来慢慢摸索就好啦。下面代码是相机绕点云旋转的代码:
# Create a circle curve first
bpy.ops.curve.primitive_bezier_circle_add(radius=10, enter_editmode=False, align='WORLD', location=(0, 0, 0), scale=(1, 1, 1))

# Create a empty axis for track
bpy.ops.object.empty_add(type='PLAIN_AXES', align='WORLD', location=(0, 0, 0), scale=(1, 1, 1))

# Set camera
bpy.ops.object.camera_add(enter_editmode=False, align='VIEW', location=(0, 0, 0), rotation=(1.10932, -4.6508e-08, 0.814928), scale=(1, 1, 1))
bpy.ops.object.constraint_add(type='FOLLOW_PATH')
bpy.context.object.constraints["Follow Path"].target = bpy.data.objects['BezierCircle']
bpy.ops.object.location_clear(clear_delta=False)
bpy.ops.constraint.followpath_path_animate(constraint="Follow Path", owner='OBJECT')
bpy.ops.object.constraint_add(type='TRACK_TO')
bpy.context.object.constraints["Track To"].target = bpy.data.objects['Empty']
bpy.context.object.data.lens = 96
点云可视化
这次我需要渲染一个8K的点云,每个点云需要有不同的颜色。大致思路是,将每个点渲染成一个球形,blender中使用Icosphere类型,然后给球赋材质。现有插件 Point Cloud Visualizer转换后的点云无法满足要求,python代码如下:
# 读取自定义ply文件
def loadClusterPly(fn):
    pointset=[]
    cidx=[]
    colors=[]
    with open(fn,"r") as freader:
        header=True
        vertices_count=0
        colors_count=0
        while header:
            line = freader.readline()
            str=line.strip().split(' ')
            if str[0]=='element':
                if str[1]=='vertex':
                    vertices_count=int(str[2])
                elif str[1]=='color':
                    colors_count=int(str[2])
            elif str[0]=='end_header':
                header=False
            #otherwise continue
        for i in range(vertices_count):
            line = freader.readline()
            numbers=line.strip().split(' ')
            pt=[]
            pt.append(float(numbers[0]))
            pt.append(float(numbers[1]))
            pt.append(float(numbers[2]))
            pointset.append(pt)
            cidx.append(int(numbers[3]))
        for i in range(colors_count):
            line = freader.readline()
            numbers=line.strip().split(' ')
            clr=[]
            clr.append(int(numbers[0]))
            clr.append(int(numbers[1]))
            clr.append(int(numbers[2]))
            colors.append(clr)

    return np.array(pointset),np.array(cidx),np.array(colors,dtype=float)/256

# 创建Icosphere
def createPoints(pxyz,cidx,colors):
    mats = []
    for i in range(len(colors)):
        # Create a material.
        mat = bpy.data.materials.new(name='Material ({0:0>2d})'.format(i))
        # Assign a diffuse color to the material
        mat.diffuse_color = (*colors[i],1.0)
        mats.append(mat)

    for i in range(pxyz.shape[0]):
        print(i)
        bpy.ops.mesh.primitive_ico_sphere_add(radius=0.004, location=(pxyz[i][0], pxyz[i][1], pxyz[i][2]))
        # Cache the current object being worked on.
        current = bpy.context.active_object
        current.data.materials.append(mats[cidx[i]])

if __name__ == '__main__':
    pxyz,cidx,colors = loadply(r'TreeCloud.ply')
    createPoints(pxyz,cidx,colors)
    # Join all mesh balls
    bpy.ops.object.select_all(action='DESELECT')
    bpy.ops.object.select_by_type(type='MESH')
    bpy.ops.object.join()
    # Save blend file
    bpy.ops.wm.save_mainfile(filepath=r'test.blend')
    # Rotate up to z axis
    import math
    bpy.context.object.rotation_euler[0]=math.pi/2)
实测在创建到2K左右个点时就变得比较慢了,界面操作也变得卡。但是选择所有的球合并mesh后就丝滑得多了。所以这里代码后面加入了选择与合并的部分,而且保存了工程文件。跑代码的时候就可以休息一下,干饭喝茶去啦。
创建圆柱
blender中原本就有圆柱,但是创建的python api太难控制,需要设置圆柱中心和旋转。而我这里是知道圆柱的底面和顶面圆心坐标,所以选择用Bezier Curve来创建圆柱轴线,然后改变线段的粗细,代码如下:
# 读取skeleton文件并且去重
def loadSkel(fn):
    pointset=[]
    pointset_dict={}
    cidx = []
    colors=[[255,0,0],[0,255,0]]
    lidx = []
    with open(fn,"r") as freader:
        header=True
        vertices_count=0
        edges_count=0
        while header:
            line = freader.readline()
            str=line.strip().split(' ')
            if str[0]=='element':
                if str[1]=='vertex':
                    vertices_count=int(str[2])
                elif str[1]=='edge':
                    edges_count=int(str[2])
            elif str[0]=='end_header':
                header=False
            #otherwise continue
        for i in range(vertices_count):
            line = freader.readline()
            numbers=line.strip().split(' ')
            #remove duplicate
            p_str=numbers[0]+' '+numbers[1]+' '+numbers[2]
            if p_str not in pointset_dict.keys():
                pointset_dict[p_str]=len(pointset_dict.keys())
            pointset.append(p_str)

            if int(numbers[4])==255:
                cidx.append(1)
            else:
                cidx.append(0)

        for i in range(edges_count):
            line = freader.readline()
            numbers=line.strip().split(' ')
            ed=[]
            ed.append(int(numbers[0]))
            ed.append(int(numbers[1]))
            ed[0]=pointset_dict[pointset[ed[0]]]
            ed[1]=pointset_dict[pointset[ed[1]]]
            lid_str = ""
            if ed[0]<ed[1]:
                lid_str = '{} {}'.format(ed[0],ed[1])
            elif ed[0]>ed[1]:
                lid_str = '{} {}'.format(ed[1],ed[0])
            else:
                continue
            if lid_str not in lidx:
                lidx.append(lid_str)
        print('vertices_count: {}, len pset: {}'.format(vertices_count,len(pointset_dict.keys())))
        print('edges_count: {}, len pset: {}'.format(edges_count,len(lidx)))

        return pointset_dict.keys(),lidx

def createSkel(pointset, lidx):
    pcoord=[]
    # Create points
    for pstr in pointset:
        numbers=pstr.split(' ')
        pt=[]
        pt.append(float(numbers[0]))
        pt.append(float(numbers[1]))
        pt.append(float(numbers[2]))
        pcoord.append(pt)
        bpy.ops.mesh.primitive_ico_sphere_add(radius=0.01, subdivisions=3, location=(pt[0], pt[1], pt[2]))
    pcoord = np.array(pcoord)
    # Merge and create material
    bpy.ops.object.select_all(action='DESELECT')
    bpy.ops.object.select_by_type(type='MESH')
    bpy.ops.object.join()
    mat = bpy.data.materials.new(name='Material points')
    mat.diffuse_color = (0,1.0,0,1.0)
    bpy.context.object.data.materials.append(mat)

    # Create edges
    for lid in lidx:
        numbers=lid.split(' ')
        pidx=[]
        pidx.append(int(numbers[0]))
        pidx.append(int(numbers[1]))
        clen = np.sqrt(np.sum(np.square(pcoord[pidx[0]]-pcoord[pidx[1]])))
        # add a curve to link them together
        bpy.ops.curve.primitive_bezier_curve_add()
        obj = bpy.context.object
        obj.data.dimensions = '3D'
        obj.data.fill_mode = 'FULL'
        obj.data.bevel_depth = 0.005
        obj.data.bevel_resolution = 4
        obj.data.resolution_u = 1
        # set first point to centre of sphere1
        obj.data.splines[0].bezier_points[0].co = (pcoord[pidx[0]][0],pcoord[pidx[0]][1],pcoord[pidx[0]][2])#(-1,-1,0)
        obj.data.splines[0].bezier_points[0].handle_left_type = 'VECTOR'
        # set second point to centre of sphere2
        obj.data.splines[0].bezier_points[1].co = (pcoord[pidx[1]][0],pcoord[pidx[1]][1],pcoord[pidx[1]][2])#(1,1,0)
        obj.data.splines[0].bezier_points[1].handle_left_type = 'VECTOR'

    # Merge and create material
    bpy.ops.object.select_all(action='DESELECT')
    bpy.ops.object.select_by_type(type='CURVE')
    bpy.ops.object.join()
    mat = bpy.data.materials.new(name='Material points')
    mat.diffuse_color = (1.0,0,0,1.0)
    bpy.context.object.data.materials.append(mat)
    bpy.ops.object.convert(target='MESH')

    # Merge and rotate
    bpy.ops.object.select_all(action='DESELECT')
    bpy.ops.object.select_by_type(type='MESH')
    bpy.ops.object.join()
    bpy.context.object.rotation_euler[0]=math.pi/2

if __name__ == '__main__':
    pointset,lidx=loadSkel('Tree_linked.ply')
    createSkel(pointset,lidx)
纯白背景和阴影
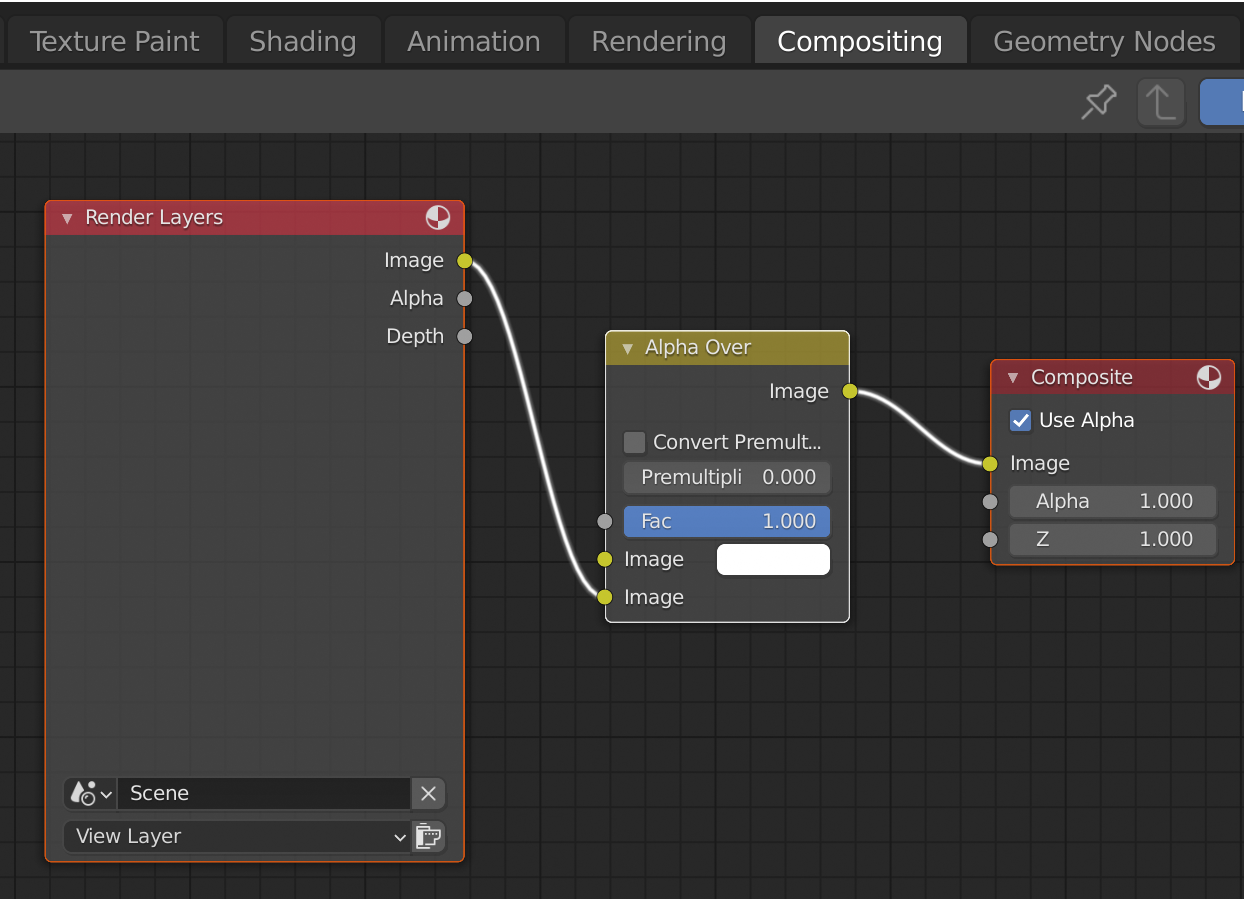
blender背景默认都是灰色,有时候需要纯白的背景,而且底面和背景需要都是纯白的,新手一上来可能都懵了,不知道怎么弄。经过我几天的摸索,终于找到了办法。大致思路就是,首先用Cycles渲染物体和阴影,并设置透明背景,代码如下:
# Create plane to catch shadow
bpy.ops.mesh.primitive_plane_add(size=10, enter_editmode=False, align='WORLD', location=(0, 0, -0.8955), scale=(1, 1, 1))
bpy.context.object.cycles.is_shadow_catcher = True
# Set render engine
bpy.context.scene.render.engine = 'CYCLES'
bpy.context.scene.cycles.device = 'GPU'
bpy.context.scene.render.film_transparent = True
bpy.context.scene.view_settings.view_transform = 'Standard'
bpy.context.scene.frame_end = 101
bpy.context.scene.render.image_settings.file_format = 'FFMPEG'
bpy.context.scene.render.ffmpeg.format = 'QUICKTIME'
bpy.context.scene.render.filepath = out_path
然后再加上纯白背景如下图:

视频编辑
打开Video Editing,可以直接把视频拖到Sequencer中。然后可以在右下角调整属性。图片和音频也可以加上。可以选中视频按Shift+A, 添加Effect Strip-Speed Control来改变播放速度。视频配音使用了TTS服务,自己写好script然后通过Notevibes转换成mp3添加到视频中就可以了。其他的平台像google和微软也都有TTS服务,但是都要信用卡信息。。。。。。
Reference
以下排名不分先后^_^
http://ziyedy.top/page/blender-python-script-basic.html
https://zhuanlan.zhihu.com/p/106406087
| 微信(WeChat Pay) | 支付宝(AliPay) |

|

|